Here's how to do it.
Things you will need.
Blog
Badge image or photo
Hosting space for image
Links to your friends' blogs
- You already have the badge/photo you want to use (if not, there will be another tutorial for that soon).
- You need to have it "reside" somewhere on the internet so that your blog can serve it up to viewers. There are lots of free image hosting places. Photobucket.com, flickr.com, and my personal favorite for image storage, www.dropbox.com are just a few to choose from.
- Upload your badge to your hosting place and get the link to your image. This is the link you will give to your friends so THEY can show your badge on THEIR blog. In order for you to show theirs, you will need a) a link to their image and b) a link to their blog.
- Now you have the images/links you need, go to your blogger dashboard and click on Layout
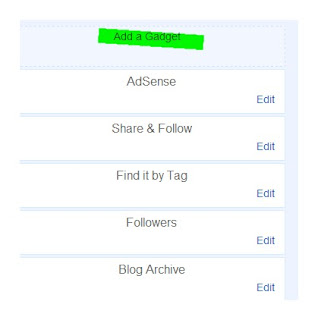
- Next click top right to "Add a Gadget". This will give you a popup window with lots of gadgets to choose from.
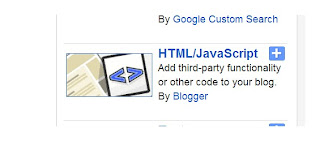
- Choose the one that says HTML/Javascript.
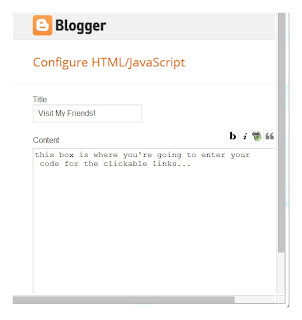
- You will get a screen that looks like this:
- The title you enter will be the title of that section of the right column of your blog where you are going to display your badge collection. I recommend using just one gadget to display all of your friends' badges. Keeps it neater and shorter that way. :)
- Here's the tricky part. You need to enter HTML here and you are going to need both the image link and your friend's blog link. This will be the format you will use, and just replace the bold text with the respective link...
<center><a href="http://Link-to-your-friends-blog.com" target="_blank"><img src="Link-to-your-friends-badge-image.com" /></a><br /><br /></center> - Click the button to save your gadget and you're done!


Add more friends' clickable badges to this gadget by editing the gadget, then copy/paste all of the code you just used from above to make this first badge, and paste it above or below the other one. Change out the image links and blog links same way you did the first time and then save again.
You can change where your badge appears by dragging it around the layout screen and dropping it.


You rock. That is all :)
ReplyDeleteWonderful!
ReplyDeleteNow go make your badges so I can add them here. :)
ReplyDeleteyippee !! I'm saving this as a reference guide...thanks so very very much for adding my badge to your page...I'm following you now...send me a code to add your badge to my blog...
ReplyDeletehttp://vintagehomeshop.weebly.com/index.html
xxoo Camille @ SSGS
You've been nominated for a Liebster Award <3 http://www.constantlyalice.com/constantlyalice/nominated-for-the-liebster-award/
ReplyDelete