Friday, December 28, 2012

How to add a badge that links to a friend's blog

So you have a group of friends who all sell stuff or make stuff or share common interests. You want to share your cute little badges with each other to create a way for your readers on one blog to find all the rest of your friends.

 Here's how to do it. 


Things you will need.
Blog
Badge image or photo
Hosting space for image
Links to your friends' blogs

  1. You already have the badge/photo you want to use (if not, there will be another tutorial for that soon). 
  2. You need to have it "reside" somewhere on the internet so that your blog can serve it up to viewers. There are lots of free image hosting places. Photobucket.com, flickr.com, and my personal favorite for image storage, www.dropbox.com are just a few to choose from. 
  3.  Upload your badge to your hosting place and get the link to your image. This is the link you will give to your friends so THEY can show your badge on THEIR blog. In order for you to show theirs, you will need a) a link to their image and b) a link to their blog.
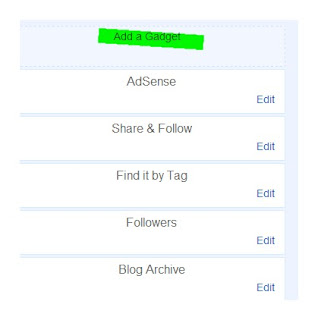
  4. Now you have the images/links you need, go to your blogger dashboard and click on Layout


  5. Next click top right to "Add a Gadget". This will give you a popup window with lots of gadgets to choose from.


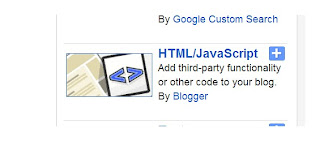
  6. Choose the one that says HTML/Javascript.


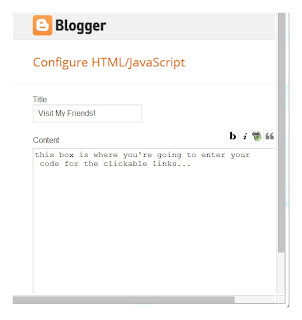
  7. You will get a screen that looks like this:
  8. The title you enter will be the title of that section of the right column of your blog where you are going to display your badge collection. I recommend using just one gadget to display all of your friends' badges. Keeps it neater and shorter that way. :)
  9. Here's the tricky part. You need to enter HTML here and you are going to need both the image link and your friend's blog link. This will be the format you will use, and just replace the bold text with the respective link...

    <center><a href="http://Link-to-your-friends-blog.com" target="_blank"><img src="Link-to-your-friends-badge-image.com" /></a><br /><br /></center>
  10. Click the button to save your gadget and you're done!
Add more friends' clickable badges to this gadget by editing the gadget, then copy/paste all of the code you just used from above to make this first badge, and paste it above or below the other one. Change out the image links and blog links same way you did the first time and then save again.

You can change where your badge appears by dragging it around the layout screen and dropping it.

Sunday, March 11, 2012

Buttercup bag and a wristlet for my friend

My BFF turned 50 today and so I made her a special present. A Buttercup bag from the free pattern here.

Then I decided I wanted to make her a wallet, too. But after searching pinterest, craftgawker and google images high and low, I couldn't come up with anything that really took my breath away.

So I got to thinking... what would happen if I just made a mini version of the Buttercup? This is a 75% reduction, without the inside pocket, a zipper added to the top and a loop for a handle.

Got the dangle doodad pull from Walmart in the beading section for like $3 I think. It has a lobster claw clasp on it, so adding it to the zipper was painlessly easy.


Here they are together so you can get an idea of size. That was my very first Buttercup bag. I had seen it around on the internet for a while now and it was on my sewing bucket list, but I had no idea how... petite it is. Quite a bit smaller than my normal everyday, lug-all-my-crap-around bag. I think the Buttercup measures 9" wide at the widest point and the strap is 22" long. When I have it on my shoulder, the bag pretty much tucks up under my arm. So the wristlet is also smaller than you might think.

I didn't measure it, but it can  hold cellphone, sunglasses, keys, credit cards, lipstick and money. What more do you need when you head into the store from your car?


So the surprise party went off without a hitch, and the bags were a HUGE hit! To top it off, she showed up wearing an outfit that matched them perfectly. How awesome is that?

HAPPY BIG 5-OH! KAREN!!


Wednesday, January 11, 2012

The Checks, Ruffles and Bow Bag

Here's my latest creation. I am just in LOVE with this sweet pea of a bag. It's a medium sized shoulder bag with magnetic snap closure, ruffled top and 2 slip pockets on the inside for organization.

The story behind this bag is that it came from the joining of two previously loved shirts.A green and blue checked men's button up short sleeved shirt, and a ladies fitted summer top with spaghetti straps. Both were purchased at the Humane Society Thrift Store here locally in what was a bag-stuffing frenzy. They had a "stuff the bag" sale where they gave you a 13 gallon trash bag (tall kitchen) and whatever clothes you could stuff into it ended up $7 for the whole sha-bang. If you got 2 bags they were $10 -- another $2 off per bag! -- so naturally I have 6 13 gal. bags of clothes waiting to be "loved twice". :)

I really had fun with this. I found a bow tutorial on the internet. I'd link to it but I don't remember where that was as I started this over a month ago and the project got set aside due to a family emergency.

Here's the finished product. If you are interested, it's for sale! $35 plus shipping. Leave a comment or contact me at signsintime (at) gmail (dot) com.