Wednesday, January 11, 2012

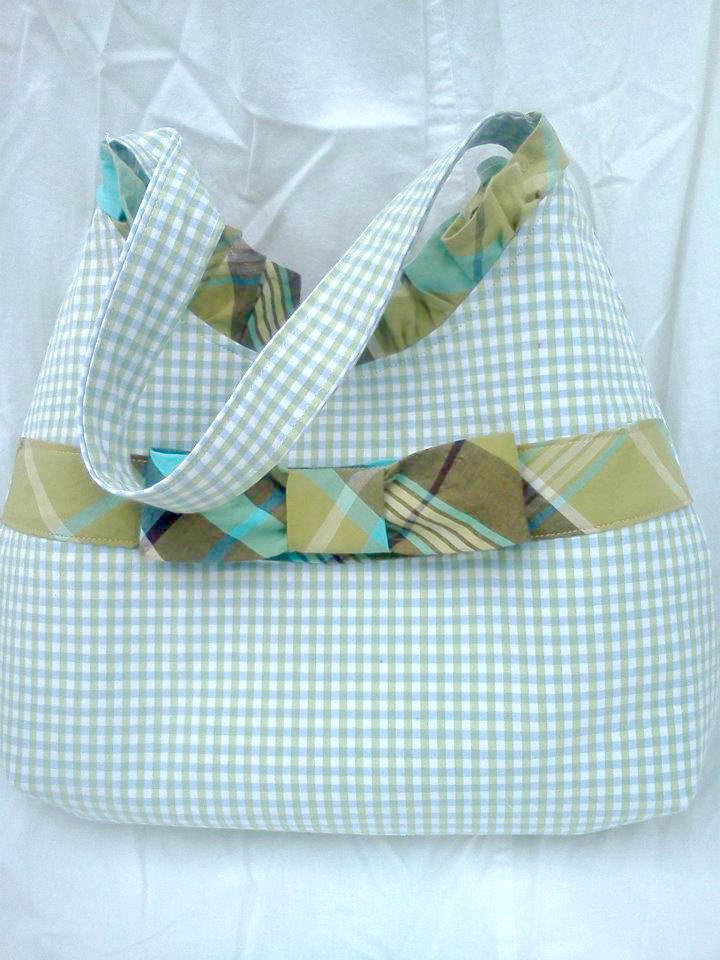
The Checks, Ruffles and Bow Bag

Here's my latest creation. I am just in LOVE with this sweet pea of a bag. It's a medium sized shoulder bag with magnetic snap closure, ruffled top and 2 slip pockets on the inside for organization.

The story behind this bag is that it came from the joining of two previously loved shirts.A green and blue checked men's button up short sleeved shirt, and a ladies fitted summer top with spaghetti straps. Both were purchased at the Humane Society Thrift Store here locally in what was a bag-stuffing frenzy. They had a "stuff the bag" sale where they gave you a 13 gallon trash bag (tall kitchen) and whatever clothes you could stuff into it ended up $7 for the whole sha-bang. If you got 2 bags they were $10 -- another $2 off per bag! -- so naturally I have 6 13 gal. bags of clothes waiting to be "loved twice". :)

I really had fun with this. I found a bow tutorial on the internet. I'd link to it but I don't remember where that was as I started this over a month ago and the project got set aside due to a family emergency.

Here's the finished product. If you are interested, it's for sale! $35 plus shipping. Leave a comment or contact me at signsintime (at) gmail (dot) com.


Saturday, December 31, 2011

Next Doodle Bag in the Works


I doodled this today and will be doing the other side this evening. Hope to have the bag made by tomorrow. That'll be in for my thrilling New Year's Eve. 

Happy New Year everyone!

The Sharpie Doodle Bag Tutorial

I have been hanging out a lot on Pinterest.com lately and came across how to "tie-dye" using Sharpie markers. Since I like to do my tie-dye the original way, I was mildly curious about how these folks thought the process was anything remotely like tie-dye, however it did pique my imagination and get me fired up about a new project...

Doodling my own pattern pieces for hand bags.

Here's the end product, my "Doodle Bag".


It was inspired in a vague sort of way by this Anthro bag that sells for $88!! I didn't have the tassels or bangles handy and I have to have a strap on my bag, but the pattern is reminiscent. :P


And here's how I did the doodling. You can do this for any bag pattern you might want to use. I didn't use a pattern but traced the general outline of one of my favorite small bags and basically "winged" it. This tutorial is more about the doodling process and less about bag construction. Just use your favorite pattern and do the doodling on the cloth using this technique.

Using a pencil, I traced a favorite small basic bag's shape onto plain 100% cotton cloth, similar to sheet material. I made sure to leave a generous 1/2" of seam allowance all the way around. If using a pattern, cut the pattern pieces out along the outline and then trace the pattern pieces using a pencil onto the cloth.

DO NOT CUT IT OUT AFTER TRACING. 

Draw some general guidelines for your design in pencil if you like.

Next, using an embroidery hoop, circle a portion of the traced pattern piece and tighten down the hoop.


Using Sharpie fine point colored markers, begin to color in background areas. If you want to make these colors looks a little like "watercolor", you can use a dab of rubbing alcohol applied with a Q-tip to the areas. Be sure to use VERY SPARINGLY!! It will totally ruin your design if you use to much -- practice on a test piece of cloth you have colored on to get the *feel* for it.

The example below was gently touched with an alcohol Q-tip in several places. If you look close you can see that the color bleeds a little.


Continue to color in your design however you like. For larger areas of color I like to use a crosshatching technique or scribbles that are in small sections at varying angles.


When coloring sections where you want black to outline lighter colors, apply the lighter colors first. Outline in black afterward.


When you've completed a section, move the hoop to a new blank area and continue until you have the whole pattern piece covered with doodles. Don't be afraid to let your mind wander while your hand takes over. Some of my best doodles are done while watching TV or talking on the phone. There doesn't have to be any rhyme or reason to the design for something beautiful to happen.


 Cover each piece of cloth where you traced the pattern with doodles and then cut them out. After you have them cut, depending on your pattern, you may want to apply fusible fleece to give the bag some body/stiffness.


Assemble your bag according to whatever pattern instructions you are using and you now have a one-of-a-kind piece of functional art! The Doodle Bag!


The

Monday, December 26, 2011

O Christmas Stick, O Christmas Stick...

We had a mishap with the fake tree. After 20 solid years of faithfully putting that same tree up, we decided to store it in the garage last year to free up some space in the loft.

Imagine our surprise when we picked up the box to carry it in the house and a family of mice sprang forth from between the box flaps. With visions of nests and pee and poo everywhere, we did not even open the box to check the damage. I still can't bring myself to look.

Now what were we going to do for a Christmas tree?

I've spent way too much time on Pinterest lately pinning one craft idea after another. It shows in the way I've started to think.

No way was I going to shell out $20 to Walmart for a dead tree I'd just be throwing out next week.

I looked around me while I stood there beside the old tree which had become Mouse Motel, and looked about the property for a likely substitute.

I spied some fallen branches from the oaks we have all around us and a seed was planted in my brain.

♫ 3 Sticks from oak trees
2 Strings of Lights
and a new tra-dition is born. ♫


I sprayed the sticks metallic silver (thinking it was gold like the cap of the spray can).
Carefully draped 2 strings of lights, then placed sections of cut garland around and added silk wrapped Styrofoam Christmas balls and the new celebratory decorative object was born.

Total cost: $2 for the can of spray paint. The rest of the stuff we already had.

This falls short of a traditional tree, yet shows more effort than say a Festivus Pole.


Hope everyone had a wonderful Christmas  Festivus  holiday!

I'm seriously thinking of doing this for every holiday. Next up? The Valentine Stick. {thanks for the idea, Cindy!}


Friday, December 23, 2011

How to Side Load Android Apps onto the Amazon Kindle Fire

Yeah, I know this isn't a craft tutorial or anything but I just got a Kindle Fire and I was all hyped up about it until I realized that when I tried to go to the Android Market for apps not available on Amazon's app store, I kept getting redirected back to the Amazon app store. Grrrr!

So a friend of mine turned me on to a way around it. Without having to jailbreak or otherwise hack the Kindle, I am now able to get any apps I want and put them onto the Fire successfully.

What you need:
A Kindle Fire
An Android Phone
A Computer
A USB cable to hook your Kindle Fire to your computer. The Kindle didn't come with one, but the one for your phone should probably work. Try it before you go buying one.
A free account at www.Dropbox.com

What to do:

1.PREP THE KINDLE Go to the settings on your Kindle Fire (the quick drop down at top right of screen that looks like a gear). Choose "More...", then select Device. Scroll down until you see "Allow Installation of Applications from Unknown Sources". Turn that to ON. Now your Kindle Fire is all set to install apps. The trick is getting the apk file onto the kindle. Go to the Amazon App Store. Search for “file manager” and take your pick of the choices. I used ES File Explorer. Install this so you can navigate your file folders on the Kindle.

2. PREP YOUR PHONE From your android phone, you need to go to the android market and get a file manager app. Astro is the one I use. Install that on your phone. After you have it installed, open it up and go to Menu > Tools > Application Manager/Backup. Select the apps you want to transfer and check them. Then click "Backup" at the top. This will put the apk for the app in a folder on your phone called "Backup".

3. PHONE AND COMPUTER: Next you'll need a way to get them off the phone and onto your computer easily. There's an app called "Dropbox" that works beautifully for this purpose and you need to have an account (free) at www.dropbox.com. What this does is give you online storage that will sync to any computer or device on which you have dropbox installed. Once installed, it's just a file sharing system of folders.

Get the program for your computer at the www.dropbox.com website. Get the app by searching Android Market for Dropbox. Install them accordingly.

4. GETTING THE APP TO THE KINDLE Once you have Dropbox on your computer and on your phone, go into Dropbox on your phone and select "Upload" at the top. In order to get to your backups folder you may have to select the "other files" button at bottom right of screen.Once in the "backups" folder, select the apps you saved in step 2.

Now time to put them on the Kindle. Plug your Kindle Fire into your computer via a USB cable. Go open the Kindle on the computer (It is one of your USB drives now and it should say "Kindle"). Make a new folder called "My Android Apps" or whatever you like. Open that folder. With your Dropbox folder open on the computer (where you just uploaded the apps off your phone), simply drag and drop from the Dropbox folder to the Kindle folder any apps you want to install.

Go back to your Kindle now and open your ES File Explorer. You should be able to see your newly created folder and the apk files inside.

Select one and click to install. You're done.

HOT TIP!:
After I was done, I also installed Dropbox on my Kindle. That makes the final step about plugging your Kindle to the computer unnecessary.

Now, I back up the apps on my phone using Dropbox, then go into the Dropbox on my Kindle and it shows up there due to the magic of syncing. All I have to do is click the apk I want from the dropbox window on the Kindle and it starts to install.


Sunday, December 18, 2011

Ribbon Dragonfly

I saw a cool tutorial for making a braided ribbon headband refashion and decided to try it out to see how easy it was to do (the ribbon braiding part). It didn't involve actually having to cut the ribbon, but consisted of interlocking loops. With a single tug of the ribbon it could all be undone if you weren't careful.

I got the tutorial here after finding it on Pinterest.com:
http://www.skiptomylou.org/2010/08/19/headband-refashion/

So I had some extremely skinny white ribbon I got from the thrift store for a quarter and decided to practice.

First I spooled out about 2 feet of ribbon to start with my "center". I didn't cut it since this was just practice and it could all be easily undone.

Then I tied a bow as if tying shoestrings. I followed that with another bow, trying (somewhat successfully-I think one side got flipped before I could get pics) to make the second set of bow "wings" to be slightly smaller than the first.

I pulled these 4 wings just as tight as I could and then started with the headband weaving tutorial from there on out.

Here's what I ended up with:

You could use these as package toppers in place of a bow for something a little different. So cute! Might also make a nice key fob or zipper pull, or even tree ornament.

I love anything dragonfly. <3

Thursday, December 15, 2011

Anthro Inspired Braided Cloth Bracelet

I had no idea those little bits of scrap fabric were worth so much!

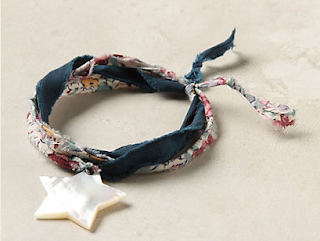
Check out this Anthro bracelet that sells for $58!

I'm inspired to make a cloth bracelet for my granddaughter to match her new cast-friendly shirt I'm working on. I can make the bracelet from the cut-off sleeve.

I got kind of carried away when I was trying to think of what to use in place of the star. I found beads, one thing led to another and next thing you know I have a bracelet that looks totally different but, in my opinion, much nicer than this expensive one. Best thing is, she loves it.

I used scraps from a shirt I made her from a piece of fabric my sister had hand tie-dyed. I made 4 strips by folding 2 long ones in 1/2. Then I made the loop (see right below the long tail at top). Then I used these instructions to make a 4 strand round braid:
http://www.seekyee.com/Slings/howtos/4strand.htm

I tied it off in a big knot that doesn't easily slip through the initial loop.

Then I strung a long strand of beads from my granddaughter's massive bead collection and wrapped them around the braid.

Finally I found some bigger pearl type beads and sewed them randomly to the bracelet.

Here she is modeling it and she loves it.


I know it was thrown together fast and could have been perfected more, but she was going to a movie with friends and I wanted to surprise her with something silly but beautiful to wear. It passed the test as you can plainly see. :)