Showing posts with label sewing. Show all posts

Tuesday, July 16, 2013

The Boxy Zippered Pouch

I have recently become addicted to making these cute – and incredibly useful – pouches. Fully lined with no raw seams inside, this is a great makeup bag, or jewelry bag. Also great for toiletries when traveling.

I have another 3 boxy zipped pouches cut out and ready to sew. I'll be adding them to my http://www.Etsy.com/shop/lovemetwiceboutique store and asking $10 for them. Quite the bargain as even a tube of lipstick to put inside it costs more than that nowadays, am I right?


So keep your eyes open peeled (ew, that's not a nice saying, is it?!)...

These pouches measure 7"x4" by 3" tall. If you want to special order a fabric/zipper combo of your very own, comment and let's get talking. I'm always up for a challenge. :)


Sunday, March 11, 2012

Buttercup bag and a wristlet for my friend

My BFF turned 50 today and so I made her a special present. A Buttercup bag from the free pattern here.

Then I decided I wanted to make her a wallet, too. But after searching pinterest, craftgawker and google images high and low, I couldn't come up with anything that really took my breath away.

So I got to thinking... what would happen if I just made a mini version of the Buttercup? This is a 75% reduction, without the inside pocket, a zipper added to the top and a loop for a handle.

Got the dangle doodad pull from Walmart in the beading section for like $3 I think. It has a lobster claw clasp on it, so adding it to the zipper was painlessly easy.


Here they are together so you can get an idea of size. That was my very first Buttercup bag. I had seen it around on the internet for a while now and it was on my sewing bucket list, but I had no idea how... petite it is. Quite a bit smaller than my normal everyday, lug-all-my-crap-around bag. I think the Buttercup measures 9" wide at the widest point and the strap is 22" long. When I have it on my shoulder, the bag pretty much tucks up under my arm. So the wristlet is also smaller than you might think.

I didn't measure it, but it can  hold cellphone, sunglasses, keys, credit cards, lipstick and money. What more do you need when you head into the store from your car?


So the surprise party went off without a hitch, and the bags were a HUGE hit! To top it off, she showed up wearing an outfit that matched them perfectly. How awesome is that?

HAPPY BIG 5-OH! KAREN!!


Wednesday, January 11, 2012

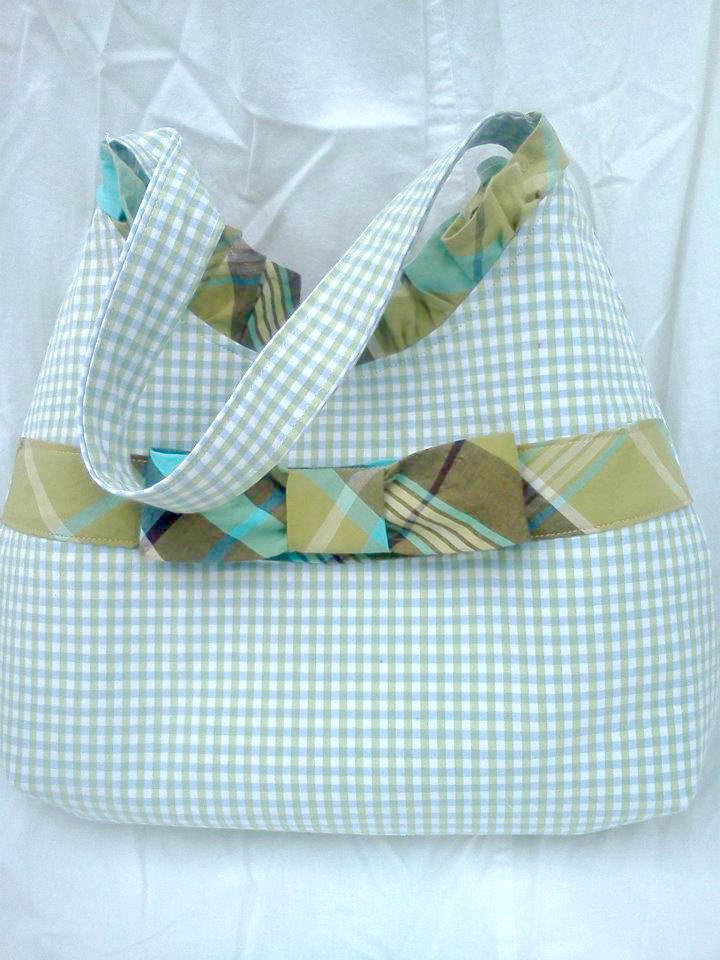
The Checks, Ruffles and Bow Bag

Here's my latest creation. I am just in LOVE with this sweet pea of a bag. It's a medium sized shoulder bag with magnetic snap closure, ruffled top and 2 slip pockets on the inside for organization.

The story behind this bag is that it came from the joining of two previously loved shirts.A green and blue checked men's button up short sleeved shirt, and a ladies fitted summer top with spaghetti straps. Both were purchased at the Humane Society Thrift Store here locally in what was a bag-stuffing frenzy. They had a "stuff the bag" sale where they gave you a 13 gallon trash bag (tall kitchen) and whatever clothes you could stuff into it ended up $7 for the whole sha-bang. If you got 2 bags they were $10 -- another $2 off per bag! -- so naturally I have 6 13 gal. bags of clothes waiting to be "loved twice". :)

I really had fun with this. I found a bow tutorial on the internet. I'd link to it but I don't remember where that was as I started this over a month ago and the project got set aside due to a family emergency.

Here's the finished product. If you are interested, it's for sale! $35 plus shipping. Leave a comment or contact me at signsintime (at) gmail (dot) com.


Tuesday, December 13, 2011

UPDATE: The silky purple re-purposed top was a hit!

My granddaughter got her first look at the new silky top and the verdict is in: she loves it!


Only thing I need to fix is to back the lace straps with some silky material as she says it feels a little scratchy. After all she's been through, she deserves a little comfort. :)

Monday, December 12, 2011

Silky top from thrifted pajama bottoms

When I was shopping for notions in my local Wal-mart's pathetic excuse for a sewing department, I came across this purple sequined floral ribbon embellishment that I had to snatch up since it was both a) sparkly and b) purple: two requirements to make my granddaughter squeal with delight.


Lately I have been sewing up a storm since it's quite apparent that garments with cast-accommodating right sleeves are non-existent. My granddaughter, poor little thing, was attacked by a dog a week ago and it broke her poor little arm. Now her arm is in a splint and wrapped with copious padding, gauze and bandages so it's huge and impossible to dress around.

Here is her favorite pajama top below:
Because this is her all time favorite top, I couldn't bear to alter it. After all, her arm will heal and she's going to want to get back to being normal. Rip away side seams and shoulders aren't your every day apparel.

So I looked through my stash of *fabric*. This stash is actually clothing from the Human Society Thrift Store. I went there on a "Stuff the Bag" day. They gave me a 13 gallon kitchen trash bag and said "stuff 2 of those for $10 total."

I was in the market for clothing with interesting fabric and buttons to make purses from. I've actually made 3 so far from this huge clothing/cloth stash but that's for another post. I bought 6 13gal bags full of clothing that day for a whopping $30.

When I thought of making my granddaughter a p.j. top like this, I instantly remembered that I'd bought at least one pair of silky pajama bottoms in an extra large adult size. The idea had originally been to use it for lining a purse, but it was silky, it was purple, and it begged to be turned into a size 7 girl's pajama top with sequined lace to girly it up more.

Once again, I didn't photograph the whole process (sorry, I'll do this the right way when I get used the hang of blogging and creating simultaneously.)

Here is the pic of the p.j.'s from when I was cataloging my cloth stash. They are a light, almost dusty, lavender.

I laid the store bought top upside down along one leg until side seams matched. Then I cut armhole shapes and straight across the top.

When I cut that out, I split the piece I cut out up center back. Then I cut some strips to make a ruffle for bottom and make bias tape to wrap cut edge of top of bodice.

Then I used the purple sequined ribbon to make a decorative strip across the chest and for the straps. Right strap has ribbon rosette sewn to it, hiding a circle of Velcro so the strap can rip away to wrap around her arm with the splint.

Then a couple or ribbon ties to close the back opening and it's done.

Here's the masterpiece in all it's glory. :)
Front

Back

I promise I'll do real tutorials just as soon as I stop to breath while tearing into a project. I got this one all cut out and half sewn before I did a face palm and said "DOH!" realizing I hadn't documented anything in photographs.

Sunday, December 11, 2011

Ruffled Shrug Re-purposed T-shirt

Hi and welcome to my brand spanking new blog. If I could have re-created it from an old blog that would have been even better since I'm going to attempt to make new stuff from old stuff and blog it here.

To kick things off, I've made this shrug for my granddaughter who recently broke her right arm (ow!) and there are no clothes that come with quick release sleeves to wrap around casts... at least not that I'm aware of.

Here's a photo of the finished project. Had I realized BEFORE I started making it that I would have this blog, I'd have taken lots more pics along the way to make a nifty tutorial.

Instead, I'll tell you how I made it and you can either figure it out on your own (it was simple) or wait for the second shrug with photos. I have to visit my granddaughter and make sure this one fits before I bother making another just yet...


Ruffled Split Sleeve Shrug

  1. Find a suitable T-shirt to transform. The one I used was my son's size 12 boys shirt that I am using to make a shrug to fit my size 7 granddaughter.
  2. Select a length for the finished shrug and cut across the shirt horizontally at this new hemline. Set extra cloth aside to use for ruffles.
  3. Cut up center front of shirt from hemline to neckline to create the 2 front panels of the shrug.
  4. Round off the 2 bottom center corners of the panels you just created.
  5. Take the extra material you just cut off the shirt and cut it apart at one of the side seams so it makes one big flat single-layer rectangle.
  6. Cut this into strips lengthwise of  1.5" or so each.
  7. Serge or zig-zag stitch the edge of the shirt starting at neckline, going down one side of front and continue until you have gone completely around shirt and back to neckline at top of other side of front.
  8. Sew your 1.5" strips together at ends to make one huge skinny strip of material.
  9. Starting at neckline, lay down your skinny strip, tucking a quarter inch under to make a finished edge at top neckline. Making sure outer edge of skinny strip stays even with shirt panel edge, start randomly bunching the material to form crazy pleats as you sew down the center of the strip. 
  10. Continue slowly going around shirt edge, sewing this ruffle down as you make the pleats at random. Stop with needle down just short of neckline (keep shirt in sewing position), trim off extra material so that you will have a small section to tuck under and make a finished edge on this side as well. Then continue to edge of neckline and finish off.
  11. Split sleeves from neckline to sleeve hem along top of sleeve.
  12. Use bias tape to make a channel to hold the ribbon drawstring. If you don't know how to sew bias tape, you can read this great tutorial about it here:  http://smashedpeasandcarrots.blogspot.com/2011/01/how-to-sew-bias-tape-tutorial.html
  13. Once the channels are made on both sides, hook a safety pin through the end of your ribbon before you cut it to length. Feed the safety pin in from hem end of the sleeve on one side and draw the ribbon up and out at neckline.
  14. WITHOUT CUTTING feed the ribbon back down the other channel of same sleeve from neckline to hemline.
  15. with sleeve flat (not gathered, make sure you have at least a couple inches of ribbon extending from the hemline of both sides and then cut off the ribbon roll.
  16. Repeat steps 11-15 for the second sleeve.
  17. Gather up the sleeves by pulling on ribbons, then tie into bows to keep them gathered.
OPTIONAL steps for making a rip away sleeve for a person who is wearing a cast and cannot get the shirt over their arm.

For the sleeve on the broken arm side, instead of looping the ribbon at neckline and continuing back down the other channel of the sleeve, only extend ribbon 1/2" past end of channel at neckline, make sure there is at lease a couple inches of ribbon extending out hem end of sleeve, and cut ribbon at neckline (leaving 1/2" to sew it down). Fold the 1/2" of ribbon at neckline back over the channel you drew it up through and tack it down by sewing back and forth a couple times over it.

Do the same thing for the other channel of that sleeve. Now you should have 2 channels on the sleeve that have ribbon going through the channel and extending out the hem of the sleeve while sewn securely at neckline.

Use a 1" strip of velcro and sew to inside of shirt at neckline so that the bias tape will be face to face with both pieces of velcro holding shirt together at neck. (see photo below).


And that's it!

Wish I had more photos for this tutorial, but when I make the next one (now that I know I'll be blogging it) I'll take lots of pics.

Happy crafting!